W4CA
Roanoke Valley Amateur Radio Club (RVARC) is dedicated to the advancement of amateur radio, serving Southwest Virginia, since 1932
Foxhole Radio
Foxhole POW Radio Construction
This foxhole radio design makes it possible to build a simple radio receiver out of little more than wire, a razor blade, a pencil and an ear bud, giving you the power to receive AM radio broadcasts and potentially life-saving intelligence without electricity or battery power.
it is best to learn how to build a simple crystal-based foxhole radio first because it’s simpler and is less likely to be discovered. This is because regenerative radio receivers radiate a signal on the frequency to which they are tuned, it is therefore possible for a competent enemy radio operator to hear the radiated transmission, telling him the POW’s are using such a radio, which could mean certain death for the brave men hiding it.
Building a simple foxhole crystal radio is also surprisingly easy and will give you a real sense of accomplishment. But first you need to gather the following easily scavenged materials. You can buy these as a ready-made kit, purchase them or scavenge them
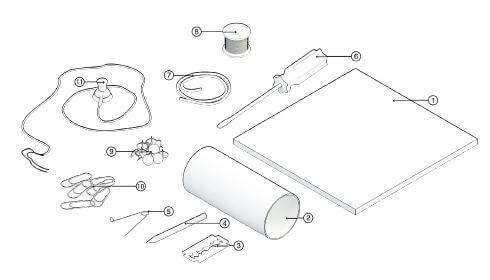
What You Need
For the mounting surface
- 1x plank of wood at least 6”x 6” (15.24cmx15.24cm).
- 12x thumbtacks
For the wiring & antenna - 6x paperclips
- 5 feet (152.4cm) of insulated wire to wire the components and 20’-100’ (6.09m – 30.48m) for the antenna (easily scrounged from telephone or computer data cables)
For the tuning coil
- 1x tube of any material approximately 1” in diameter and 5” long. A toilet paper tube or PVC pipe will work
- 33’ (10m) of magnet wire. (For a tube with an outside diameter of 1” (2.54cm)
For the cat’s whisker
- 1x safety pin (large)
- 4x pieces of 4” (10.16cm) of solid copper wire
- 1x tip of a lead or graphite pencil, or a galena crystal (e.g. silicon or iron pyrite)
For the earbud
Piezo-crystal earbud (1K-24K ohms impedance)
For the detector
A blued or rusty razor blade
For the ground
A stake of conductive metal. E.g. a steel or copper pipe or screwdriver strong enough to pound into the ground
1 x bottle of water (1L)
- 6”x6” (15cmx15cm) WOOD PLANK
- PVC PIPE OR TOILET ROLL
- BLUED RAZOR BLADE
- PENCIL
- SAFETY PIN
- SCREWDRIVER
- INSULATED WIRE
- MAGNET WIRE COATED IN NONCONDUCTIVE COATING
- THUMBTACKS
- PAPERCLIPS
- PIEZOELECTRIC CRYSTAL EARPIECE
Tools
- A pair of needle nose pliers
- Wire Cutters
- Wire Strippers
How to Build It
The Tuning Coil
- Poke a hole in your tube, towards one end, then thread the wire through the hole and secure it with a knot, tape or adhesive.
- Wrap your wire around the tube roughly 120 times to form a smooth surfaced coil with minimal protrusions.
- Once done, fix the other end of your wire in place so it doesn’t fall from your tube.
- Attach your coil to the top edge of your board with thumbtacks, whilst ensuring they do not touch the wire.
- Thumbtack two paper clips to each side of the board about an inch below the tube. Use these to grip the ends of your wires, by wrapping them together, after stripping the varnish from the ends of your magnet wire.
The Detector
- Tack the blued razor blade to the board and wire it to the paperclip on the left edge of the board.
TIP: You can also blue your own razor by heating it to between 275 and 325 degrees Fahrenheit using a propane torch or by heating it over coals with tongs and a bellows. You want the razor blade to turn a bluish color. If you can’t find a single-edged razor blade a blade from a razor knife or similar blade will work.
The Cat’s Whisker
- Cut the clip off the safety pin and shove it into the graphite of the blunt end of a sharpened pencil stub.
- Push the sharp end of the pencil into the board just to the right of the blued razor blade so the tip of the pencil can contact any part of the blade. If necessary, coil the solid core copper wire around the pencil stub and safety pin to hold them together.
- Finish the cat’s whisker by connecting it to the other paper clip thumbtacked to the board just to the right of the safety pin.
The Earbud
- Cut the connector off the earbud and strip the ends of the two wires.
- Connect one wire to the paperclip to the right of the cat’s whisker.
- Connect the other end to the paperclip to the right of the tuning coil.
TIP: Although a low-impedance magnet-coil earbud (used with cell phones & iPods) can be made to work under ideal conditions, a high-impedance piezoelectric crystal earbud is more sensitive. Ideally, impedance should be over 1K ohms. An earbud with less than 100 ohms impedance may not work or may only work under near-ideal circumstances.
The Antenna
- Run the antenna wire from the paperclip to the left of the tuning coil.
TIP: The longer your antenna, and the higher up it is, the better your reception will be. You could make do with 25’-30’ (7.62m – 9.14m) of antenna wire or clip the wire to a set of bedsprings to improve reception, but a long antenna 50’-100’ (15.24m – 30.48m) long will help you pull in stations from father away.
The Ground
- Connect one end of the ground wire to the paperclip to the right of the tuning coil and the other to a foot or two of copper pipe staked deep into the ground.
- Wet the ground around the stake with a liter or so of water to ensure a good foundation.
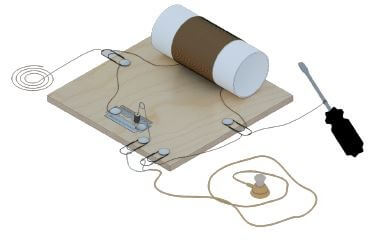
Your Foxhole POW Radio
Detecting radio stations with this type of radio requires patience and trial and error. Gently move the pencil lead across the surface of the razor blade, focusing on the edges or writing on the blade away from the ground edge while listening to the earbud. If you don’t hear anything right away, don’t give up. Adding a few light scratches with a file or bit of quartz rock can also be helpful. Keep trying and keep in mind that if no one is transmitting on a given frequency you would have no way of knowing whether the radio is working. But you should be able to hear AM radio stations within twenty-five miles or so. A problem with this simple design is lack of selectivity. That means that in some areas, you may hear more than one station at once! Moving the pencil lead across the razor blade or adding or removing a few coils from the tuning coil may help. Once you have the basics down and are confident your radio works, you can also research upgrades to this design.